Saturday, December 11, 2010

Tarheel Stamper - Snowflake Trio


Snowflake Trio


Photographed in natural light

Photographed with flash

 Largest is about 15 inches in diameter


I saw a magazine with snowflakes made of wooden craft sticks and wood shapes and loved them so I made some.  One hint they had was to draw intersecting lines on a scrap paper and then use that to build your snowflake.  It makes it easier to glue them together correctly.  I used lots of glitter, but it was hard to photograph.  I stamped the trio of snowflakes in Serene Snowflakes on a glue pad and then sprinkled glitter on top of that.  They are so pretty hanging in the window.  These are hard to photograph.  The diameter of the largest is 15 inches.  I spray painted them white.  There is a plastic ring hot glued to the back to hang them from on some pretty ribbon.  Hope you have a wonderful day!  Let it snow...let it snow....let it snow...somewhere else today.  LOL We are visiting Brattonsville Plantation to see their Christmas event.  I love Christmas and attending local Christmas events.  Check out your local calendars and see what is available near you!  Have fun with your family and of course stamp something!  LOL

Happy Stampin',
Tammy aka Tarheel Stamper

Tuesday, December 07, 2010

Tarheel Stamper - Snowman Klenex Box


This is not 100% Stampin' Up!  I saw this Justrite stamp set at a local scrapbook store and love the snowman. I picked up the snow stuff at the store.  I heat embossed the stamped images with black and silver embossing powder.  Then I took bleach and brushed it inside the embossed area on the ones I colored with markers.  I used an online tutorial for the Kleenex box cover.  I love how it turned out.  Card stock, inks, embossing folders, accessories are Stampin' Up!  You can click on the photos for a larger view.

Have a wonderful day!
Tammy aka Tarheel Stamper

Monday, December 06, 2010

Tarheel Stamper Doggone


Ok  I am a very bad aunt.  LOL  I didn't get my nephew's birthday card made and in the mail on time for his birthday which was on Thanksgiving day this year.  Doggone it! I just seem to get distracted by so much and fail to do the important things. 

Anyway I used D is for Dog stamp set.  Card stock is Always Artichoke, Not Quite Navy, Old Olive and Very Vanilla.  I used My Digital Studio to create the verse and sentiment in Chocolate Chip.  I love that program.  It is useful in so many different ways.  I used the Large Oval punch for the sentiment.  The Square Lattice embossing folder is great for masculine cards.  The wood texture pieces are from Sizzix's Texture Plate Kit #4 Stampin' Up! sells.  I embossed a 4 1/4 x 5 1/2 piece of Chocolate Chip so I would have enough for the house, roof, and the oval behind the sentiment.  I cut a 2 1/2 x 2 1/2 inch piece of Chocolate Chip for the dog house and punched the door with the large oval punch.  I added a scrap of Basic Black behind the opening.  You could pop up the house over the black, but I chose to just layer the black on the back of the house.  I did pop up the roof with dimensionals.  I stamped the dog from D is for Dog on Very Vanilla and cut out leaving a small border.  The sentiment is popped up with dimensionals also.

The inside greeting was printed on a piece of Very Vanilla with My Digital Studio. I trimmed it down to 3 x 5 inch piece.  I stamped the bones in Not Quite Navy.  Masculine cards seem to be harder to make.  I think my nephew will like this even though he is an adult.  We all need fun in our lives right?

Hope you have a wonderful day!
Tammy aka Tarheel Stamper


Wednesday, December 01, 2010

Tarheel Stamper - Thanksgiving Scrapbook Page

Wow it has been a while since I posted.  I tend to get busy with everyday life and push some things to the side.  I made this page last week from a scrapbook page kit we received at the Columbia Stampin' Up!  regionals I attended in October.  I added some swirly Sizzix decorative strip pieces along the side and also on top of the ribbon.  I think it turned out cute.  I will have to add some pages.  I used a Maple Leaf Sizzix die to cut out Cajun Craze and More Mustard card stock.  I had each of our Thanksgiving guests write what they were thankful for on a leaf.  I will include these on a scrapbook page I  made soon.  I thought it would be interesting to see what we wrote a year from then. 

Hope you have a great day!
Tammy aka Tarheel Stamper


Thursday, November 25, 2010

Tarheel Stamper - Happy Thanksgiving!

Hope you have a very Happy Thanksgiving!


Got the below text from http://www.nps.gov/history/history/online_books/source/sb2/sb2w.htm


27. "BLESSINGS OF FRUITFUL FIELDS


Thanksgiving was first celebrated by the settlers at Plymouth in the Massachusetts colony in 1621 under the leadership of Governor William Bradford. Washington and Madison each issued a Thanksgiving proclamation once during their Presidencies. It was not until 1863, however, when Lincoln issued his Thanksgiving Day Proclamation that the holiday was established as a national annual event, occurring on the last Thursday of November. The first observance of the national holiday came one week after the dedication of the Soldiers National Cemetery at Gettysburg. The language of the proclamation is beautiful and marked by a rare felicity of expression.


The year that is drawing toward its close has been filled with the blessings of fruitful fields and healthful skies. To these bounties, which are so constantly enjoyed that we are prone to forget the source from which they come, others have been added, which are of so extraordinary a nature that they cannot fail to penetrate and soften the heart which is habitually insensible to the everwatchful providence of almighty God.


In the midst of a civil war of unequaled magnitude and severity, which has sometimes seemed to foreign states to invite and provoke their aggressions, peace has been preserved with all nations, order has been maintained, the laws have been respected and obeyed, and harmony has prevailed everywhere, except in the theater of military conflict; while that theater has been greatly contracted by the advancing armies and navies of the Union.


Needful diversions of wealth and of strength from the fields of peaceful industry to the national defense have not arrested the plow, the shuttle, or the ship; the ax has enlarged the borders of our settlements, and the mines, as well of iron and coal as of the precious metals, have yielded even more abundantly than heretofore. Population has steadily increased, notwithstanding the waste that has been made in the camp, the siege, and the battlefield, and the country, rejoicing in the consciousness of augmented strength and vigor, is permitted to expect continuance of years with large increase of freedom.


No human counsel hath devised, nor hath any mortal hand worked out these great things. They are the gracious gifts of the most high God, who while dealing with us in anger for our sins, hath nevertheless remembered mercy.


It has seemed to me fit and proper that they should be solemnly, reverently, and gratefully acknowledged as with one heart and one voice by the whole American people. I do, therefore, invite my fellow-citizens in every part of the United States, and also those who are at sea and those who are sojourning in foreign lands, to set apart and observe the last Thursday of November next as a day of thanksgiving and praise to our beneficent Father who dwelleth in the heavens. And I recommend to them that, while offering up the ascriptions justly due to him for such singular deliverances and blessings, they do also, with humble penitence for our national perverseness and disobedience, commend to his tender care all those who have become widows, orphans, mourners, or sufferers in the lamentable civil strife in which we are unavoidably engaged, and fervently implore the interposition of the almighty hand to heal the wounds of the nation, and to restore it, as soon as may be consistent with the Divine purposes, to the full enjoyment of peace, harmony, tranquillity, and union.


In testimony whereof, I have hereunto set my hand and caused the seal of the United Stated States to be affixed.


PRESIDENT LINCOLN'S THANKSGIVING DAY PROCLAMATION, OCTOBER 3, 1863.

Wednesday, November 24, 2010

Tarheel Stamper - Christmas Poinsettia Card


Another card we made at Saturday's stamp camp.  I love the vintage feel of this card.  I printed the poinsettia image from My Digital Studio.  I did stamp the ladies' image though.  Colored with Cherry Cobbler (my favorite red) and Always Artichoke reinkers, and used a Daffodil Delight marker for the center. The Deck the Halls Designer Series Paper is so pretty.  Used the Vintage Wallpaper
Texture embossing folder for the Always Artichoke card base.  Merry Christmas came from the Come to Bethlehem stamp set and is stamped in Always Artichoke and punched with the Modern Label punch.  I have a pdf here.


Have a wonderful day,
Tammy aka Tarheel Stamper


Tuesday, November 23, 2010

Tarheel Stamper - Blog Award

The sweet and talented Nancy Dawson from Paper Dreams and Creative Wishes selected me to receive this Stylish Blog Award!  Thanks so much for this honor. 

I have to tell you 8 things about myself and nominate 8 other blogs for this award.  There are so many wonderful blogs I follow so this is in no way the only "stylish" blogs I would put on here, but I am limited to 8.  So without further ado...here are the eight blogs I have nominated.  Please save the picture below  and do the above requirements and brighten someone's day as my day has been brightened! 


Check out these "Stylish" bloggers!

  1. http://chrissyd723.blogspot.com/  Creating with Christy


8 Things about me
  1. Love the Lord!
  2. The first time I was introduced to stamping I didn't like it. 
  3. Have been a Stampin' Up! demonstrator for over 5 1/2 years so as you can tell I fell in love with stamping.
  4. I am a great caser of other's creations and occasionally come up with something worth sharing.
  5. My favorite color is green. 
  6. Love trees.
  7. Once worked at a job where I made small repairs on chain saws.  LOL  No joke!
  8. Have a wonderful husband who supports my stampin' habit. 
Have a wonderful day!
Tammy aka Tarheel Stamper


Friday, November 19, 2010

Tarheel Stamper - Christmas Collage Card


I love this card.  I cased a card on Robin Merriman's blog and just fell in love with it.  I have a pdf here with instructions.  Embossing is a great technique and I love how you can use Classic Ink and still emboss with it.  If you ink up the stamp with Versamark first, then sponge on a Classic Ink color as I did with this card, you can heat emboss with clear powder and get whatever color of ink you have embossed!  I love that technique.  I like the vintage feel of this card.  The new seam binding (Cherry Cobbler)  is so pretty and easy to work with.  I can't believe how long it has been since I posted, but I was busy cutting pieces and preparing for my Christmas Stamp Camp tomorrow.  We will be making this card tomorrow.

Hope you have a great weekend.
Happy Stampin',
Tammy aka Tarheel Stamper

Tuesday, November 16, 2010

Tarheel Stamper - Goodbye Sweet Gina

I couldn't post this until today.  Every time I worked with some photos of Gina, our 14 1/2 year old Golden Retriever mix, I just couldn't finish.  She was such a sweet dog.  We will miss her dearly.  I understand that she is not a human, but she was a member of our family for many years.  Our sons grew up with her.  They miss her too.  She loved everyone she met and would tell them so.  She loved McDonald's french fries and would beg for those!  LOL  She "talked" a lot and loved doggie bones.  She was not a watch dog which is why we she adopted us.  I made this 12 x 12 scrapbook page on My Digital Studio in honor of her life and joy she gave to us.  What a special doggie.  She flew across the Pacific in the belly of a jet and then rode across the US from Los Angeles, CA to Gastonia, NC.  She was a great dog and never any trouble.  We love and miss her!  You can click on the photo to see a larger copy.  Hope you don't mind me posting this personal event, but she was special to me.  I hope to be back to posting stamping projects soon. 


Thursday, November 11, 2010

Tarheel Stamper - Happy Veteran's Day

Happy Veteran's Day!

Made this card on My Digital Studio. I love how I can use punches, embellishments, designer series papers, and card stock on my computer to make a card, scrapbook page, or other project quickly. 


Thanks to all those who have served our country in our armed services! 

I am so proud of my husband who served in the US Army for 20 years.  Thanks honey!


Have a great day and thank a veteran for your freedom!
Tammy aka Tarheel Stamper

Wednesday, November 10, 2010

Tarheel Stamper - Royal Blog Tour Christmas Tag Box

Christmas Rose Tag Box


Hope you thoroughly enjoyed your stay at the Royal Blog Tour castles during the blog tour.  A lot of work goes into the tour behind the scene and I appreciate all the time and effort put into it.

Now on to some instructions for the Christmas Tag Box and some more tags. 

I found the tutorial for the Christmas Tag Box from the super talented Becky Jensen of Stamp That.  You can see her tutorial here


I changed my box lid a little.  I made one lid per her instructions from card stock.  Then I laid it down flat on top of my cutting mat without cutting or taping the lid.  It was scored so I could see where the sides of the box lid were.  I cut out a square using a ruler and straight edge.  I measured in 3/4" from the score lines to cut the center out.  That was a 5 1/2" square cut out of the center of the box lid.  I cut a 6 inch square from Thick Window Sheet to glue under the box lid.  I stamped the flower image from Delightful Decorations on the window sheet in Stazon Opaque White.  You have to be careful not to slide the stamp around once you stamp.  I stamped on the box lid in the same ink.  Assemble the box lid as the tutorial instructs.  I cut a length of ribbon and adhered it underneath the bottom of the lid.  That way you don't have to untie it to open the box.  

One other thing I did differently was to glue the inserts to the side of the box with Tombow Multi-purpose glue.  I just held the side of the box to the insert for a few seconds until it stayed together.  

To make the raised platform under the folded punched ornament tags, I cut a 4 1/2" square and scored at 1/2" in from each edge.  Follow instructions on tutorial.  

Come back tomorrow for some more tag photos and following that more photos and directions for some of the ornaments. 

Have a great day,
Tammy aka Tarheel Stamper

To purchase supplies used in this and other projects on my blog visit http://www.tammyhowell.stampinup.net/
 

Tuesday, November 09, 2010

Tarheel Stamper - Christmas Rose Tutorial


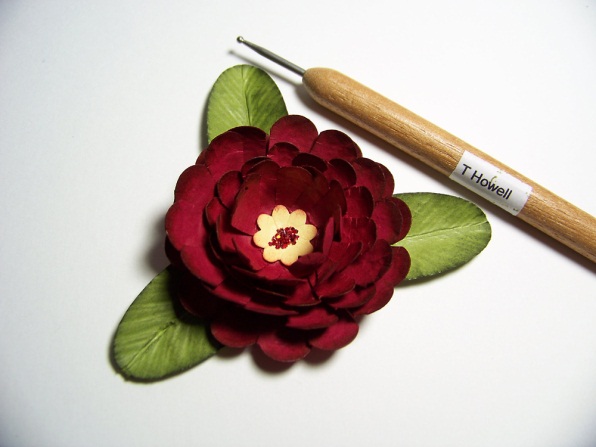
As promised here is the tutorial for the rose I made for the Christmas Rose on the tag box.  I love these and made a bunch for my Stampin' Up! Christmas tree I have here. 

Hope you enjoyed the Royal Blog Tour as much as I did.  There are so many great ideas to case.  What a talented bunch of stampers we had on this tour!  Wow so many wonderful castles to visit!

The tutorial is below and a link to a pdf file for the tutorial is at the end if you want to save it for future access. 

Christmas Rose Tutorial
1. Punch necessary flower, circles and ovals.


2. Snip toward center of all scallop circles to form petals.


3. Place flower on top of piercing mat or mouse pad. Starting on outside edge of petal and using larger end of stylus, press down on stylus while rubbing in a circular motion. These will make the card stock shiny and appear worn or antiqued. Continue this along length of the petal toward the center. Repeat for all petals on flower.


4. Using stylus large end, rub around the inside close to where you snipped the petals. Continue large circular motion moving in toward center until you achieve the desired result. Repeat steps 2 to 4 for remaining Cherry Cobbler large and small scallop circles.


5. Using stylus large end, rub around the inside of the small Boho Blossom So Saffron flower.


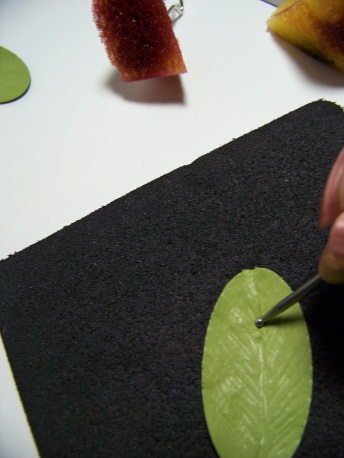
6. For the leaves, place punched Old Olive large oval on top of mat. Emboss a line with small end of stylus down the center of leaf. With small end, emboss lines on each half of leave to simulate veining. Run stylus down center to define that line again. Repeat for all leaves. Fold on center line and bend if desired in realistic leaf shape.


7. Sponge edges of Cherry Cobbler flowers with Cherry Cobbler ink.


8. Sponge edge of Boho Blossoms small flower with So Saffron ink.


9. Sponge edges of leaves with Always Artichoke ink. Lightly rub sponge over veining on leaves leaving some areas without sponging.


10. Put small amount of Tombow Multi-glue in center of So Saffron flower and sprinkle red chunky glitter on top. Let dry a while and then shake off excess.


11. Glue layers of flowers together using two large and two small scallop circles and one small flower.


12. Glue leaves to back of flower.


13. Spray flower with mixture of Frost White Shimmer paint and alcohol. I used an old spray Stampin’ Mist bottle for mine. If you do this please protect yourself and do it in a well-ventilated area. Do not breath in pain mixture.


Use as desired. I used on my small Christmas tree by just standing up on branches. Also can use as a gift topper or on top of a box such as the Christmas Tag box I made for the Royal Blog Tour. I was inspired by Jerrie Jimenez of a A Touch of Grace. She has some lovely creations.

Feel free to share this document, but please give me credit. If you would like to order any of the products, click on the business link below and click shop now.

Thanks,

Tammy Q Howell aka Tarheel Stamper

To purchase product please visit my business website www.tammyhowell.stampinup.net or click on the shop now button in the right side bar.


Products used in this tutorial


Product Item # Price


Cherry Cobbler Card stock 119685 $6.95

Old Olive Cobbler Card stock 100702 $6.95

So Saffron Card Stock 105118 $6.95

Cherry Cobbler Classic Ink 119669 $5.95

Always Artichoke Classic Ink 105219 $5.95

So Saffron Classic Ink 105213 $5.95

1 3/4” Scallop Circle punch 119854 $16.95

2 3/8” Scallop Circle punch 118874 $16.95

Boho Blossoms punch 119858 $16.95

1 3/4” x 7/8” Oval punch 119855 $15.95

Stylus 100663 $2.50

Sponge 101610 $3.50

Multipurpose Liquid Glue 110755 $3.95

Chunky Essentials Glitter 108797 $15.95

Mat Pack 105826 $9.95

Frost White Shimmer Paint 116854 $5.95

http://www.scribd.com/doc/41685306/Christmas-Rose-Tutoria1  You can access the pdf document at the link to the left.

Royal Blog Tour Blog Candy

I used Random Number Generator to choose the number of the winner!  I counted the entries and the winner is........


Hi Tammy, I loved your projects on the blog hop. Those ornaments sparkle and really dress up a tree. I need to make some of those tag boxes for teacher and co-worker gifts, such a fun holiday gift and functional!!! Thank you for offering blog candy, it is always fun to think about winning. Rose Kerery


Congratulations Rose...you don't have to think about winning because you did!  I have contacted Rose and will send out her stamp set pictured below as soon as possible. 
 
Thanks for stopping by my castle on your Royal Blog Tour.  I appreciate all the emails and comments!  It is so kind of you to take the time to comment as I know it is a long tour.  Your comments are sweet and encouraging!  I will have another blog post today with instructions for the Christmas Rose.  In the coming days I will have one for the box. 
 
Have a wonderful day!
Tammy Q Howell aka Tarheel Stamper

Thursday, November 04, 2010

ROYAL BLOG TOUR - Hear Ye Hear Ye! Christmas Time is Coming!

 
Welcome most honored guest to my stampin' castle on the Royal Blog Tour!
I am pleased that you have stopped by for a visit on your journey today. 

Hope you enjoy your royal stay at my stop on the Royal Blog Fall Tour.  I am sure you have seen some wonderful castles and they have treated you royally.
For my featured stamp set, I used Delightful Decorations.  I love that Stampin' Up! has a coordinating punch to quickly cut out the images.  Also the 3/4" circle punch, cuts the small images neatly.  And I am giving away one of Delightful Decorations stamp set of royal blog candy to one honored participant!  Details about entering are at the end of this post.

I decided to make 3D ornaments and also Christmas Tags in a box.  I live in two states because of my husband's job and wanted a tree to have during the days we are in our rental home.  What is better than making the ornaments myself and using Stampin' Up!'s wonderful products?  I love Christmas and decorating with Stampin' Up! paper crafts.


My first project is a Christmas Tag box. 


I made the center of the  box lid with a thick window sheet stamped with Opaque White Stazon ink.  The outside of the box lid is also stamped with Opaque White Stazon ink. Card stock used is Old Olive, Very Vanilla, Cherry Cobbler, Always Artichoke, Jolly Holiday Designer Series Paper, and thick window sheets. Inside are 3" x 3" gift enclosure tags, folded punched ornament tags, and single sided ornament tags to tie on or include inside gifts.  The ribbon is the gorgeous seam binding in the Holiday Mini catalog.  I will have a tutorial for the Christmas rose on top of the box after the tour.  I used some of these to decorate my tree.  Subscribe to my blog or check back after the tour is over for more information.


 Inside view of the box.


Close up of some of the 3 x 3 note cards.  I will have more photos in the coming days.


Next I will show you some of the ornaments I made.  I will have more photos and instructions in the coming days of some of the other ones I made.  

This ornament has basic rhinestones on it.  We all need a little bling in our life!


The following ornament was coated with Versamark ink and heat embossed with Iridescent Ice embossing powder.  It is so shiny like a crown!


Threaded a pearl bead on top of this ornament.  Jewels are a standard part of a princess's wardrobe!


 Now on to the blog candy.  You must email me your name and email address to tarheelstamperblogcandy@gmail.com to enter to win the stamp set Delightful Decorations.  I will use a random number generator to pick the winner.  Emails will be numbered in the order they are received.

I will contact the winner at the email address listed in their email to me.  You will not be entered to win the blog candy unless you email me at tarheelstamperblogcandy@gmail.com  You can go the Royal Blog Tour homepage after the Blog Tour is over to see the names of all the winners. 

Also I appreciate comments and the time you take to leave them!  I know that taking a blog tour is an undertaking and appreciate your comments! 

And now I must bid you, "Fare thee well"!  I know you will enjoy the rest of the wonderfully talented queen and princess stampers residing in the gorgeous castles on this tour!  Come back and see me sometime.  I love guests!

Tarheel Stamper - FTL114 Floating Snowflakes Cards

Floating Snowflakes Cards


My watermark on my photo should say card stamped by Tammy Howell not designed.  Sorry about that.


I cased this card for this challenge.  I love the simplicity of Clean and Simple cards, but rarely make them.  I find one layer cards difficult to make.  These two cards I made are the same except for the colors.

I used the CAS Challenge sketch pictured in yesterday's post here.

Card Supplies:
Stamp Sets: Come to Bethlehem, Serene Snowflakes
Card Stock - Pacific Point, Marina Mist
Ink - Pacific Point, Marina Mist, Versamark
Accessories - White and clear embossing powder

Royal Blog Tour - Game Day 6