Showing posts with label Royal Blog Tour. Show all posts

Tuesday, November 09, 2010

Tarheel Stamper - Christmas Rose Tutorial


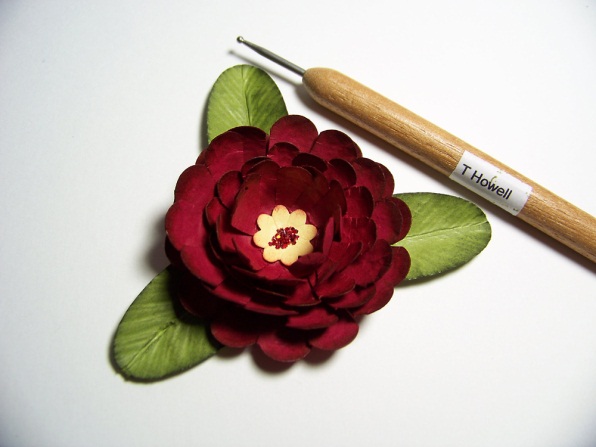
As promised here is the tutorial for the rose I made for the Christmas Rose on the tag box.  I love these and made a bunch for my Stampin' Up! Christmas tree I have here. 

Hope you enjoyed the Royal Blog Tour as much as I did.  There are so many great ideas to case.  What a talented bunch of stampers we had on this tour!  Wow so many wonderful castles to visit!

The tutorial is below and a link to a pdf file for the tutorial is at the end if you want to save it for future access. 

Christmas Rose Tutorial
1. Punch necessary flower, circles and ovals.


2. Snip toward center of all scallop circles to form petals.


3. Place flower on top of piercing mat or mouse pad. Starting on outside edge of petal and using larger end of stylus, press down on stylus while rubbing in a circular motion. These will make the card stock shiny and appear worn or antiqued. Continue this along length of the petal toward the center. Repeat for all petals on flower.


4. Using stylus large end, rub around the inside close to where you snipped the petals. Continue large circular motion moving in toward center until you achieve the desired result. Repeat steps 2 to 4 for remaining Cherry Cobbler large and small scallop circles.


5. Using stylus large end, rub around the inside of the small Boho Blossom So Saffron flower.


6. For the leaves, place punched Old Olive large oval on top of mat. Emboss a line with small end of stylus down the center of leaf. With small end, emboss lines on each half of leave to simulate veining. Run stylus down center to define that line again. Repeat for all leaves. Fold on center line and bend if desired in realistic leaf shape.


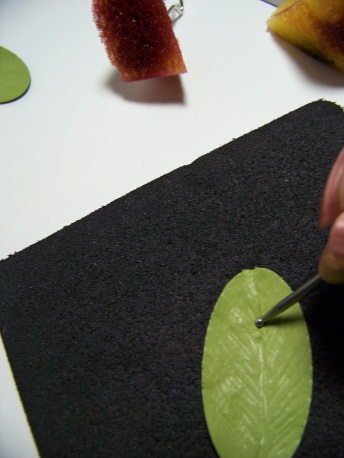


7. Sponge edges of Cherry Cobbler flowers with Cherry Cobbler ink.


8. Sponge edge of Boho Blossoms small flower with So Saffron ink.


9. Sponge edges of leaves with Always Artichoke ink. Lightly rub sponge over veining on leaves leaving some areas without sponging.


10. Put small amount of Tombow Multi-glue in center of So Saffron flower and sprinkle red chunky glitter on top. Let dry a while and then shake off excess.


11. Glue layers of flowers together using two large and two small scallop circles and one small flower.


12. Glue leaves to back of flower.


13. Spray flower with mixture of Frost White Shimmer paint and alcohol. I used an old spray Stampin’ Mist bottle for mine. If you do this please protect yourself and do it in a well-ventilated area. Do not breath in pain mixture.


Use as desired. I used on my small Christmas tree by just standing up on branches. Also can use as a gift topper or on top of a box such as the Christmas Tag box I made for the Royal Blog Tour. I was inspired by Jerrie Jimenez of a A Touch of Grace. She has some lovely creations.

Feel free to share this document, but please give me credit. If you would like to order any of the products, click on the business link below and click shop now.

Thanks,

Tammy Q Howell aka Tarheel Stamper

To purchase product please visit my business website www.tammyhowell.stampinup.net or click on the shop now button in the right side bar.


Products used in this tutorial


Product Item # Price


Cherry Cobbler Card stock 119685 $6.95

Old Olive Cobbler Card stock 100702 $6.95

So Saffron Card Stock 105118 $6.95

Cherry Cobbler Classic Ink 119669 $5.95

Always Artichoke Classic Ink 105219 $5.95

So Saffron Classic Ink 105213 $5.95

1 3/4” Scallop Circle punch 119854 $16.95

2 3/8” Scallop Circle punch 118874 $16.95

Boho Blossoms punch 119858 $16.95

1 3/4” x 7/8” Oval punch 119855 $15.95

Stylus 100663 $2.50

Sponge 101610 $3.50

Multipurpose Liquid Glue 110755 $3.95

Chunky Essentials Glitter 108797 $15.95

Mat Pack 105826 $9.95

Frost White Shimmer Paint 116854 $5.95

http://www.scribd.com/doc/41685306/Christmas-Rose-Tutoria1  You can access the pdf document at the link to the left.

Thursday, November 04, 2010

ROYAL BLOG TOUR - Hear Ye Hear Ye! Christmas Time is Coming!

 
Welcome most honored guest to my stampin' castle on the Royal Blog Tour!
I am pleased that you have stopped by for a visit on your journey today. 

Hope you enjoy your royal stay at my stop on the Royal Blog Fall Tour.  I am sure you have seen some wonderful castles and they have treated you royally.
For my featured stamp set, I used Delightful Decorations.  I love that Stampin' Up! has a coordinating punch to quickly cut out the images.  Also the 3/4" circle punch, cuts the small images neatly.  And I am giving away one of Delightful Decorations stamp set of royal blog candy to one honored participant!  Details about entering are at the end of this post.

I decided to make 3D ornaments and also Christmas Tags in a box.  I live in two states because of my husband's job and wanted a tree to have during the days we are in our rental home.  What is better than making the ornaments myself and using Stampin' Up!'s wonderful products?  I love Christmas and decorating with Stampin' Up! paper crafts.


My first project is a Christmas Tag box. 


I made the center of the  box lid with a thick window sheet stamped with Opaque White Stazon ink.  The outside of the box lid is also stamped with Opaque White Stazon ink. Card stock used is Old Olive, Very Vanilla, Cherry Cobbler, Always Artichoke, Jolly Holiday Designer Series Paper, and thick window sheets. Inside are 3" x 3" gift enclosure tags, folded punched ornament tags, and single sided ornament tags to tie on or include inside gifts.  The ribbon is the gorgeous seam binding in the Holiday Mini catalog.  I will have a tutorial for the Christmas rose on top of the box after the tour.  I used some of these to decorate my tree.  Subscribe to my blog or check back after the tour is over for more information.


 Inside view of the box.


Close up of some of the 3 x 3 note cards.  I will have more photos in the coming days.


Next I will show you some of the ornaments I made.  I will have more photos and instructions in the coming days of some of the other ones I made.  

This ornament has basic rhinestones on it.  We all need a little bling in our life!


The following ornament was coated with Versamark ink and heat embossed with Iridescent Ice embossing powder.  It is so shiny like a crown!


Threaded a pearl bead on top of this ornament.  Jewels are a standard part of a princess's wardrobe!


 Now on to the blog candy.  You must email me your name and email address to tarheelstamperblogcandy@gmail.com to enter to win the stamp set Delightful Decorations.  I will use a random number generator to pick the winner.  Emails will be numbered in the order they are received.

I will contact the winner at the email address listed in their email to me.  You will not be entered to win the blog candy unless you email me at tarheelstamperblogcandy@gmail.com  You can go the Royal Blog Tour homepage after the Blog Tour is over to see the names of all the winners. 

Also I appreciate comments and the time you take to leave them!  I know that taking a blog tour is an undertaking and appreciate your comments! 

And now I must bid you, "Fare thee well"!  I know you will enjoy the rest of the wonderfully talented queen and princess stampers residing in the gorgeous castles on this tour!  Come back and see me sometime.  I love guests!

Tuesday, August 24, 2010

Tarheel Stamper Tuesday Tips - Royal Blog Tour Queen Voting

Voting starts today!


This isn't a stampin' tip, but an information tip.  I have participated in several Royal Blog Tours and they are always full of talented and wonderful demonstrators.  You can vote for six honorary queens to be on the tour.  Just go to the link above and click on RBT Honorary Queen Poll on the left side.  If you don't know the ladies' blog addresses, I have linked them below. 

Have a wonderful stampin' day,
Tammy aka Tarheel Stamper


Carole'Anne Sluchinski - Stampin' Stress Away with Carole'Anne

Erika Martin - Stampin' Mama Designs

Ilina Crouse - My Creations

Lee Conrey - Stampingleeyours


Marilyn SanClemente - Marilyn's Creative Inspirations

Monica Weaver - Add a Little Dazzle


Sandi MacIver - Sandi MacIver

Selene Kempton - Stamp 4 Fun

Sharon Field - Created By U

Tina Taves - Life's Randomness

Saturday, July 25, 2009

Royal Blog Tour Tommorow!


The Royal Blog Tour is three days long, and you'll be happy it is! There are four tours - a total of 80 fabulous blogs!
But wait - there's more!
Blog Candy, Blog Candy, and more Blog Candy. Over 50% of the blogs on this tour are offering Blog Candy.
Check the Princess list on launch day. Every name with an asterisk next to it is offering
blog candy.
That's not all! The Royal Blog Tour Home Page is offering their own Blog Candy. And it is -- a Big Shot Die Cut Machine!!!! Honestly - you don't want to miss this tour!

This drawing is open to all countries represented by Princesses in this tour, including Canada and Australia!